JunkMatcher Howto: General
(new stuff is in red)- How does JunkMatcher work?
- Do I need to run JunkMatcher.app all the time to make it work?
- Can both JunkMatcher and the built-in junk filter run together?
- How do I check for newer versions of JunkMatcher?
- There are so many windows - care to explain what they are for?
- What is the Analyzer window for?
- How do I load an email into JunkMatcher to analyze it?
- How do I run all the tests over a loaded email for analysis?
- What is a property test?
- What is a pattern test?
- How do I turn on/off a test?
- Can I write patterns to match non-English emails?
- What is a matching strategy?
- What are message views?
- Why can't I find subject/sender/recipient lines in the headers view?
- Any difference between body view and rendering view?
- Could JunkMatcher influence the built-in filter?
- What should I do if a piece of junk mail went through? (False negatives)
- What should I do if a clean message got junked? (False positives)
- How do I correct JunkMatcher if it made a mistake?
- What are these precision/recall (P/R) numbers?
- How do I reset the statistics of some/all of the tests?
- How long is one microsecond (usec)?
How does JunkMatcher Work?
To users JunkMatcher has two major components: a Mail plugin intercepting and matching emails, and a JunkMatcher.app for controlling the plugin. JunkMatcher is represented as a rule inside Mail.app's rule system (accessible via Rules in Mail.app's Preferences): it is the rule with name "JunkMatcher" (more on rules in Mail.app).
For each incoming email reaching the "JunkMatcher" rule in Mail.app (assuming the rule is active), JunkMatcher does the following:
- Checking the whitelist: If the email address of the sender matches any regular expression specified in the Whitelist, the message is classified as clean and the matching process stops.
- Conducting tests: the incoming email is then checked by a list of tests - a test can be either a property test or a pattern test. Based on different matching strategy, JunkMatcher will then classify the message as clean (negative, or ham) or junk (positive, or spam) using the results it gathers from conducting these tests.
- Executing actions: JunkMatcher can then (optionally) mark a positive message as junk in Mail.app, so Mail.app could learn from this result. More actions can be specified directly in Mail.app's rule system.
Do I need to run JunkMatcher.app all the time to make it work?
No you don't. JunkMatcher.app is just the GUI part of JunkMatcher - you run it only to adjust settings, build new patterns, receive pattern updates online, check the log, etc. The filter will be engaged via the "JunkMatcher" rule in Mail.app.
Can both JunkMatcher and the built-in junk filter run together?
Absolutely.
How do I check for newer versions of JunkMatcher?
Choose the menu item "Check for Application Update" under the JunkeMatcher menu:
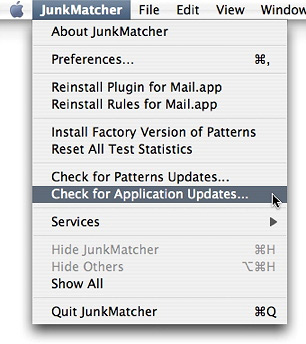
You can also tell JunkMatcher to check for newer versions every time it launches.
There are so many windows - care to explain what they are for?
JunkMatcher.app has four main windows:
- Analyzer window: This is where you can load in a piece of email and do a detailed analysis. You get to see the list of available tests, to turn on/off individual tests, to reorder tests, to tweak various settings of the tests (via their Test Inspector windows), to build/test your patterns etc., all from this window.
- Log window: This is where you can check what JunkMatcher has done to your emails. You can also correct JunkMatcher from this window (alternatively you can make/revert your correction right from Mail.app).
- Whitelist Window: This is where you manage your whitelist - a list of senders whose messages you don't want JunkMatcher to check. You can use regular expressions in the whitelist.
- Sites window: This is where you manage the collection of "bad sites" collected from the matched junk mails. This collection is then used to identify spam.
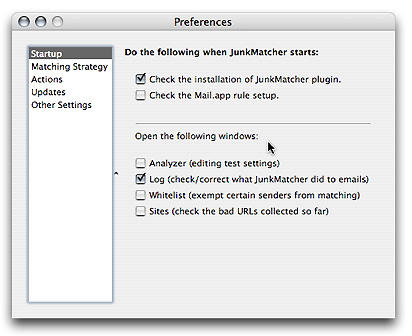
You can open these individual windows via the items under the Window menu, or simply click on the corresponding icons in the toolbars of these windows. You can also instruct JunkMatcher.app to automatically open some of these windows for you when it starts up via the Preferences window (can be found under the JunkMatcher menu):
What is the Analyzer window for?
The Analyzer window is probably the most important window in JunkMatcher.app. It lets you analyze emails, view the list of available tests, turn on/off individual tests, reorder tests, tweak various settings of the tests (via their Test Inspector windows), or build/test your patterns etc. You can find the details through out this site - here I'll briefly introduce the window itself to you. Here is a screenshot:
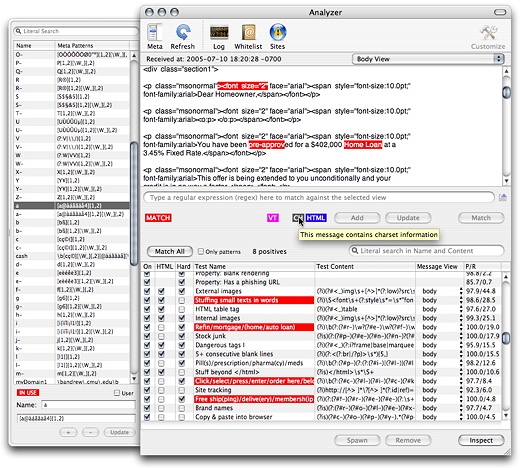
Other then the drawer to the left, the window has two parts: the upper half shows you the different views of a loaded email, and the bottom half presents the complete list of tests at your disposal. When you load in an email, the window shows you its received date, the content of various views, and several colored indicators:
- BT: The loaded message has bad tags.
- URL: The loaded message has hidden URLs.
- VT: The loaded message has vacuous tags.
- FN: The loaded message has file attachments.
- CH: The loaded message has charset (encoding) information.
- HTML: The loaded message is a HTML-based email.
These colors are used to highlight the corresponding texts inside the upper-half of the window too (e.g., if you see the pink "VT" lit up, use the message view popup menu at the upper-right corner to switch to "HTML source with Vacuous Tags" and scoll the text content a bit - you'll see the pink highlighted texts indicating where the "vacuous tags" are).
A side note: if you don't know what the first three in the list above mean, please select the property test "HTML has too many bad tags", "HTML has too many hidden URLs" or "HTML has too many vacuous tags" and hit the "Inspect" button at the lower-right corner: this will bring up their Test Inspector windows and inside them you will find the explanations.
The lower half of the Analyzer window is occupied by the list of tests. You can:
- Turn on/off individual tests;
- Mark them HTML only tests;
- Mark them hard/soft tests;
- Change the targeting views for pattern tests;
- Spawn pattern tests to target additional views;
- Check on their performances;
- Reorder the tests by dragging and dropping them into places.
Does that sound like a piece of loaded GUI! Fortunately the usual workflow to develop a new pattern test is fairly straightforward.
Finally the drawer to the left holds a list of meta patterns. You can open/close the drawer via its icon in the toolbar or by choosing View -> Toggle Meta Patterns Drawer (cmd-T) menu item.
How do I load an email into JunkMatcher to analyze it?
There are 3 ways to do this:
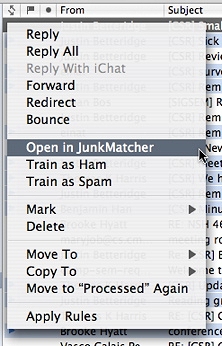
Load emails from within Mail.app
You can choose a contextual menu item "Open in JunkMatcher" in Mail.app to do this:
Load emails from a text file
You can first save the raw message source of an email into a file (in Mail.app, choose File -> Save As..., change the "format" to "Raw Message Source" and save), and then open the (text) file in JunkMatcher.app by choosing File -> Open Raw Message Source, or simply dropping the file onto the icon of JunkMatcher.app.
Load emails in JunkMatcher.app's Log window
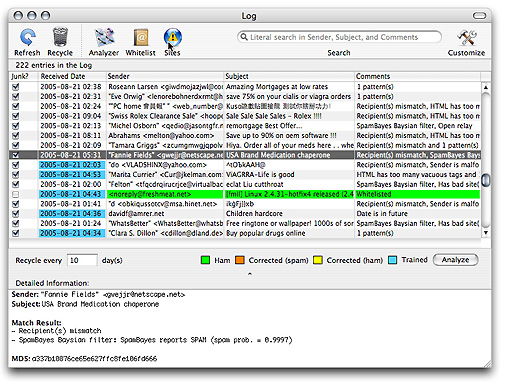
You can select the entries you want to load in the Log table, and click on the "Analyze" button there, or simply double-click on the entry.
How do I run all the tests over a loaded email for analysis?
After you loaded an email into the Analyzer window, you should be able to click on the "Match All" button (it's immediately above the test table) to run the message through all of the tests that are switched on. If you tick the switch box labeled with "Only patterns", then only the pattern tests will be run. This is desirable because some of the property tests require Internet connection and may take a bit longer to finish.

In either case, the matched tests (positive tests) will be highlighted in red, the number of the positive tests will be reported, and for the pattern tests, their first instance of matches in the email text will be highlighted in red in the message content of the Analyzer window (the upper-half).
There are two convenient settings to make Match All a more pleasant experience, and both of them can be found in the "Other Settings" section of the Preferences window (accessible under the JunkMatcher menu):
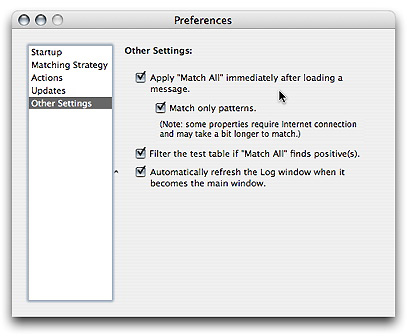
- You can tell JunkMatcher to start a Match All process immediately after you load in a message; if this is turned on, you can also limit the matching to only the pattern tests.
- You can tell JunkMatcher to display only the positive tests in the Analyzer window if any is found. This is actually achieved by automatically starting a search using the query string "test:matched" in the Analyzer window - so you will see the string filled into the search box for you. To break out of this "filtered" display mode, just click on the "X" (cancel) button at the right side of the search box and you will again see the complete list of tests.

What is a property test?
A property test (or just "property") is any test on emails you can think of other than pattern matching. JunkMatcher has about two dozens of very useful property tests, including naive Bayesian filtering, blacklist lookup (checking if emails are sent from one of the known spamming hosts on Internet), phishing URL detection, or even more personalized tests such as checking whether an email is sent to too many people you don't know (based on the data in your Address Book), etc.
What is a pattern test?
A pattern test (or just "pattern") is always targeted to a certain part
of an email (called a message view), and as
the name implies, it tries to detect the presence of certain textual
patterns. Some examples are checking whether the pattern
"v1ägra" (deformed "viagra") occurs, or whether an HTML-based
email includes any external images (via the HTML tag <img src="http://...>),
etc.
JunkMatcher uses a flexible format called regular expressions to represent patterns.
How do I turn on/off a test?
First make sure you have the Analyzer window on screen (if not choose the menu item Window -> Open Analyzer). Then in the lower half of the window you see a big list of tests. Just click on the "On" switch box to toggle on/off a test, like this:

Can I write patterns to match non-English emails?
Sure you can - JunkMatcher supports all languages covered by Unicode. You can even build specialized patterns targeting certain languages.
What is a matching strategy?
A matching strategy dictates whether to classify an email as junk based on the results from conducting the tests. For example, a linear matching strategy will conduct the tests in the order specified by a user, and will classify a message as junk if it has collected a certain number of positive tests. You can change this number to make JunkMatcher more sensitive or more conservative.
What are message views?
An email can be cut into several pieces - the most obvious way is to cut it into headers and body. This allows us to compartmentalize the matching process for better precision: for example, you might want to single out those extremely long words in the message body, without the fear that the pattern will most likely match something in the email headers.
JunkMatcher provides 7 message views for you to match: they are subject, sender, headers, body, filenames (the attachment filenames), charsets (including the charsets used anywhere in an email), and rendering. When loading an email into JunkMatcher.app, these views are available via a popup selector:
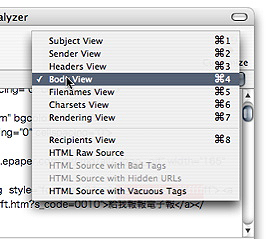
There are also other views provided only for informational purposes (i.e., you cannot filter spam by writing patterns for these views). These are the views listed below the menu separator.
Why can't I find subject/sender/recipient lines in the headers view?
Because they are already available in the subject/sender/recipient views. To avoid overlapping, they are removed from the headers view. This also makes matching against headers easier.
Any difference between body view and rendering view?
For plain (text) emails there is no difference between these two views. For HTML-based emails, the body view contains the HTML code, while the rendering view contains a text-based rendering (i.e., no images) of the email. This is so that you can defeat certain tricks spammers use to avoid being filtered.
Could JunkMatcher influence the built-in filter?
Yes - assuming you have turned on both rules "Built-in Junk Filter" and "JunkMatcher" in Mail.app's rule system, and you have told JunkMatcher to mark matched messages as junk. In fact I read somewhere that someone had used JunkMatcher to quickly re-train Mail.app's built-in filter after he lost Mail.app's settings.
What should I do if a piece of junk mail went through? (False negatives)
First you should correct JunkMatcher so it will try not to make the same mistake again (the Bayesian filter will also benefit from your correction). Additionally you might want to tweak the matching strategy settings to increase the sensitivity of JunkMatcher. If you have turned on the SpamBayes property test, you might also want to decrease its spam cutoff value to make it more sensitive.
If a piece of junk mail falls through but there is no corresponding record in JunkMatcher's Log, it means the message never reached the "JunkMatcher" rule in Mail.app's rule system in the first place. You may want to make sure there is no interference from the other rules (for example, some rules executed before the "JunkMatcher" rule might have moved the message away).
Another possible reason that an email didn't get checked by JunkMatcher is that the sender of the email is in your Previous Recipient list. This list is accessible in Mail.app via the menu item Window -> Previous Recipients. An email address is entered there by Mail.app if (1) you have sent an email to this address before; or (2) you have marked an email from this address from Junk to Not Junk (or equivalently, you have moved the message from the Junk folder to a non-Junk folder).
If an email is sent from your own email address then it will not be checked by JunkMatcher, because one of the rule criteria of the "JunkMatcher" rule is "Sender is not in my Address Book" (and most likely your address is in your Address Book).
If your settings are fine, but none of the properties/patterns is positive, then it's time to do a bit more forensic analysis. Load the message into JunkMatcher's Analyzer window, tweak the settings of properties, or try to come up with a good pattern to identify the junk. If you are new to writing patterns (regular expressions), here is a tutorial you can walk through.
What should I do if a clean message got junked? (False positives)
First you should correct JunkMatcher so it will try not to make the same mistake again (the Bayesian filter will also benefit from your correction). Additionally you might want to tweak the matching strategy settings to decrease the sensitivity of JunkMatcher. If you have turned on the SpamBayes property test, you might also want to increase its spam cutoff value to make it less sensitive.
For linear matching strategy, if you found out that JunkMatcher actually collected fewer positive tests than you had specified, it is because some tests are designated as hard tests.
You can also whitelist certain senders so emails from them will never be checked by JunkMatcher. This is particularly useful if you subscribe to many mailing lists, because emails from these subscriptions could share many characteristics of junk mails (for examples they usually don't address you in the To/CC line, they usually contain URLs which identifies the recipient, etc.).
How do I correct JunkMatcher if it made a mistake?
There are two ways to correct JunkMatcher (or to revert a previous correction). The first one is to just do whatever you would when correcting Mail.app's built-in filter: you can
- Click on the "junk bag" icon in the Mail.app's toolbar or the "Not junk" button in the message pane to toggle a message's junk status;
- Bring up the Message menu or the contextual menu on a selected email in Mail.app and choose "Mark as Junk/Not Junk Mail" item;
- Or move emails out of/into a junk mailbox to change their junk status.


When you do one of the above, if the selected message is still in JunkMatcher's log, your correction will be registered and SpamBayes will be trained. If for some reason the message is not in your log (maybe JunkMatcher didn't check on it or your log has been recycled recently), then the correction will not be registered but SpamBayes will still get trained. BUT in either case, Mail.app's built-in filter will always be trained.
The second way to make/revert a correction is to do it via the Log window. However, making/reverting corrections this way will not benefit Mail.app's built-in filter (although sometimes you might want to keep things separate).
What are these precision/recall (P/R) numbers?
JunkMatcher records test statistics all the time, and precision (P) and recall (R) are two numbers that summarize the test performances.
Precision measures how "precise" JunkMatcher is in classifying emails: it means "out of all the things JunkMatcher claims to be junk, how many of them are real junk".
Recall measures how "productive" JunkMatcher is in classifying emails: it means "out of all the real junk, how much JunkMatcher has been able to identify".
To put these two numbers together, high precision means JunkMatcher might miss a lot of junk, but it is also less likely to throw away clean emails. High recall means JunkMatcher can find a lot of junk, but it is more likely to trash a good email.
A higher P usually implies a lower R, and vice versa. Ideally we want both of them to be as high as possible.
Here are the formulae for calculating precision and recall (the difference is in the denominators):
Recall = # of true positives / (# of true positives + # of false negatives)
Precision and recall are popular metrics used in the research areas such as information retrieval.
How do I reset the statistics of some/all of the tests?
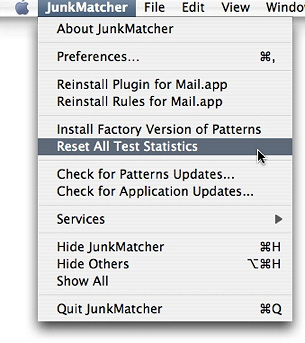
To reset all of the statistics, look for the menu item "Reset All Test Statistics" under the JunkMatcher menu.
To reset the statistics of an individual property/pattern test, look for "Reset"/"Reset All" button in the Test Inspector window for the property/pattern (shown respectively in the screenshots below):
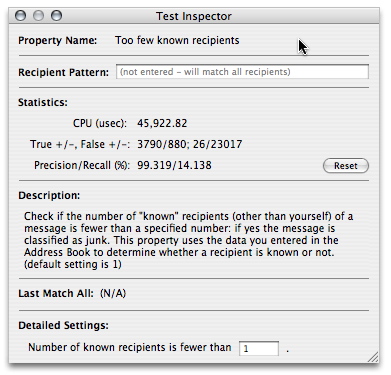
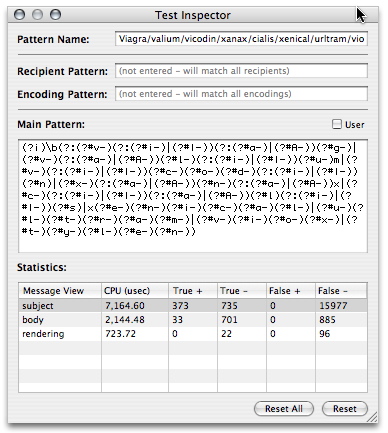
For patterns you can even choose to reset statistics for an individual message view: simply choose the view in the statistics table inside the Test Inspector window, and hit the "Reset" button (see the screenshot above).
How long is one microsecond (usec)?
1 usec is one millionth (10-6) of a second.